


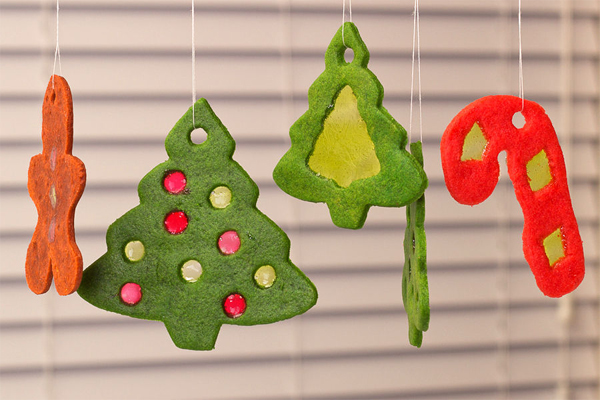
Here’s How to Make Stained Glass Christmas Ornament Cookies
School’s out, kids (or almost out, for those of you who have deans and principals who hate you). But whether your winter break started last Friday or starts this week, coming home for the holidays usually means a couple of things for most people. First, presents. Second, hot, delicious, home cooked meals for the first time since Thanksgiving. Lastly, discovering that as much as you hated finals, the internet can only hold your interest for so long.
That’s right, if you’re anything like the rest of the school-aged general population (or have kids who are), sometime these next couple of weeks, you’ll remember that as much as you’ve been hyping up winter break in your mind, the reality usually just consists of coldness and boredom, in spades.
Hopefully this adorable DIY project from Janine over at Sugarkissed can at least help alleviate those darn Winter Blues.
—-
Stained Glass Christmas Ornament Cookies
INGREDIENTS:
- 1-1/4 cup unsalted butter
- 1-1/3 cup sugar
- 1 egg + 1 egg yolk
- 2 teaspoons vanilla extract
- ½ teaspoon almond extract
- 3 cups all-purpose flour
- ¼ teaspoon salt
- 1 teaspoon baking powder
- Candy cane, gingerbread man, Christmas tree, and mini Christmas tree cookie cutters
- Green, red, and brown gel food coloring
- Green and red hard candy (such as Jolly Ranchers or Life Savers)
- Straws
- String, twine, or thin ribbon
DIRECTIONS:
Step 1: Make and Color Your Dough
- Cream together the butter and sugar. I set the butter out on the counter for about 30 minutes, chopped into small squares, to bring it to room temperature before beginning. (I have had bad luck with using the microwave to bring butter to room temperature.
- Beat in the eggs (I set these out on the counter with the butter to bring them to room temperature too), vanilla, and almond flavorings.
- In a separate bowl, sift together the flour, salt, and baking powder.
- One cup at a time, mix the dry ingredients into the wet. Scraping down your bowl as needed.
- Divide dough into three equal sections. Add a few drops of red coloring to the first section, green to the second, and brown to the third. Knead each section of dough until the coloring is spread evenly throughout. Wrap dough and store overnight in the fridge
Step 2: Cut Your Dough

- When you are ready to bake, take the dough out of the fridge and let it sit on the counter for a few minutes so it’s not too hard to work with. Roll dough to desired thickness. Use your cookie cutters to cut the dough into holiday shapes, removing sections from the center of each one where you want to have the stained glass effect. To remove a tree shaped center from your Christmas tree cookies, use a slightly smaller Christmas tree cookie cutter. To remove small circles from your Christmas tree and gingerbread men cookies, use a straw. To remove rectangle sections from your candy cane cookies, use a sharp knife to cut the shapes by hand. Also, use a straw to cut holes in the dough at the top of each cookie so you can string them up as ornaments later.
Step 3: Bake Your Cookies

- Set your dough shapes in the freezer for about 10 minutes before baking to reduce spreading. While your cut dough is in the freezer, prepare your candy for the stained glass centers. Unwrap all of your green and red hard candy and place them in separate sealed Ziploc bags. Use a kitchen mallet or rolling-pin to crush the candy into tiny pieces.
- Remove your chilled dough from the freezer and bake for 4 minutes or until the dough is just set.
- Remove the cookies from the oven and carefully scoop a small amount of candy into cutout centers of each one. Set the cookies back in the oven for an additional 4 minutes.
- Remove the cookies from the oven and use the pointy end of a toothpick or sharp knife to pop any large unwanted bubbles in the candy.
- Let stained glass cookies completely dry before storing or stacking them.
Step 4: Display Your Cookie Ornaments

- To turn your cookies into ornaments, simply loop some pretty string, twine, or ribbon through the hole you created at the top of the cookies.
Recipe and photos via Sugarkissed